Currently Shopping For: : Portal

Offset Printing

High-quality, professional offset printing services.

Offset printing is the printing method used for large or commercial-scale print runs and ensures consistency and color accuracy. Our offset presses quickly turnout your large orders with superior quality and flawless images on every printed piece.

How Offset Printing Works

Offset printing or offset lithography is the workhorse of the printing industry and almost every commercial printer does some sort of offset printing. However, a high-quality final product is often due to diligent planning, execution, and equipment provided by your commercial printer.

Offset lithography is based on a very simple principle: ink and water don't mix. Text and pictures are imaged onto printing plates, which are dampened first by water, then ink. Ink adheres to the image area, the water to the non-image area. Next, the image is transferred to a rubber blanket, and from the rubber blanket onto the paper. We call this process "offset" because the image does not go directly to the paper from the plate.

Step 1: Making Printing Plates

offset printing

Prior to the plate-making process, digital files are arranged on a computer in such a way as to maximize the use of the sheet of paper being used. This process is called imposition. Imposition also helps ensure that when the press sheet is cut and folded, that it is done in such a way to maximize efficiency in the manufacturing process.

Then, before any project can go on press, the digital files are imaged onto metal printing plates. Information from digital files is transferred to the printing plates in much the same way as digital photographs are imaged. A measured amount of light, usually laser light, is used to expose the printing plate in a plate-making system. When exposed to light, a chemical reaction occurs that activates an ink-receptive coating on the printing plate. This results in the transfer of the digital image onto the metal plate.

There are different materials for printing plates, including paper (which produces a lower-quality product) and polyester. The best plate material is aluminum, which is more costly, but provides the quality and durability necessary to produce high-quality offset printing.

Each of the primary process colors—CMYK or cyan, magenta, yellow, and black—has a separate printing plate. Even though you may see thousands of colors in the finished product, only these four colors are used.

Step 2: The Press Run

At Conquest Graphics we use the sheet-fed method of offset printing. Pre-cut paper is fed through the press as a stack or pile of press sheets. Sheet-fed offset presses print at very high speeds and use very large sheets of paper. Press speeds can reach up to 20,000 impressions per hour. An impression is equal to printing one side of a full press sheet (40 inches x 28 inches.)

As a sheet of paper is fed into the printing press, it will move through a series of rollers and blankets where the ink is transferred onto the paper. A four-color press will have 4 or more “units” which are separate sets of rollers and blankets for each color to be oriented. As the press sheet moves from one unit to the next, another color will be transferred to the sheet of paper.

sheet-fed offset printing press

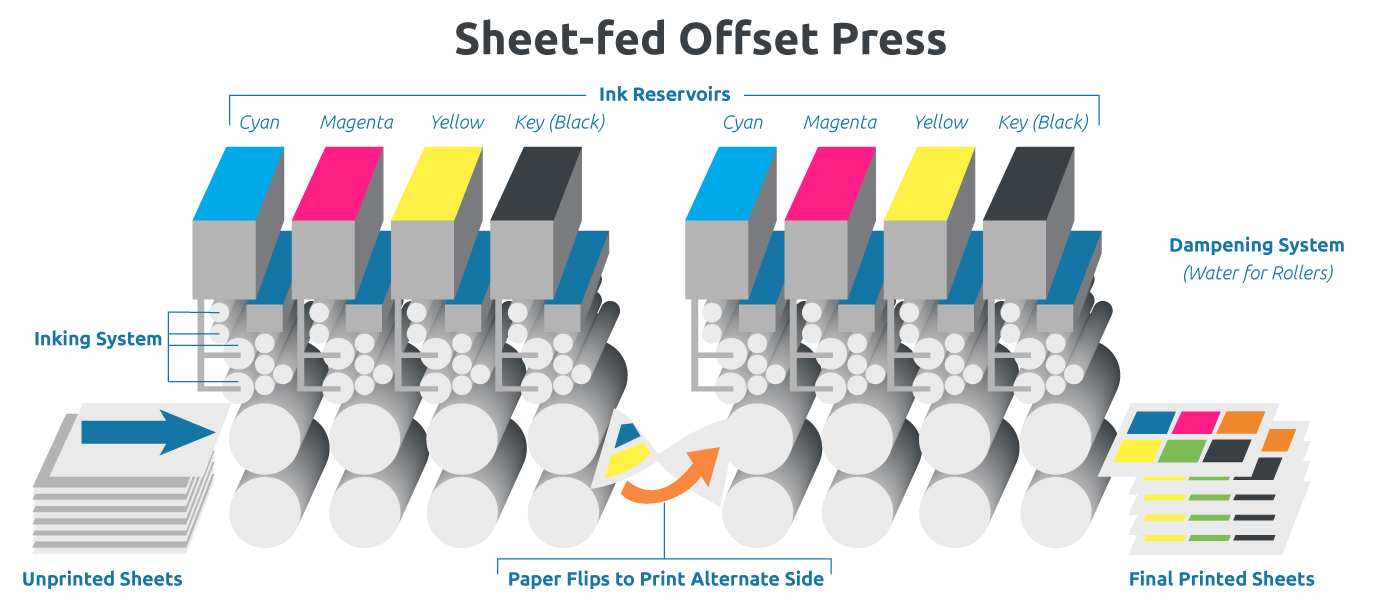
The ink is transferred to the printing plates through a series of rollers. On the press, the printing plates are dampened, first by the water rollers, then by the ink rollers. These rollers move the ink from the ink fountain onto the printing plates.

The image area of the printing plate accepts ink from the ink rollers. The water rollers help to keep ink off of the non-image areas of the printing plate. Each printing plate then transfers the image to a rubber blanket that in turn transfers the image to the paper. The plate itself never actually touches the paper. This is what is meant by offset printing.

offset printing

Color and Registration Control

Color and registration control are processes that are controlled by computers. Registration is the alignment of the printing plates as they transfer their respective color images to the press sheet. If the plates do not line up perfectly, the image will appear out of focus and the color will be blurry. As the press runs, a computer scans a set of registration marks that have been placed on the press sheet. Each printing plate has its own individual set of registration marks. The computer reads each of these marks and automatically makes on-the-fly adjustments to the position of each printing plate in order to achieve optimal alignment. All of this occurs many times per second while the press is running at speed.

Color control is a process that controls the placement of ink on the press sheet and is related to plate registration. The amount of ink that is released into the color units depends on how much ink is required to achieve a certain ink density on the press sheet. In modern sheet-fed presses, color control is managed by a computer that is part of the control system of the press. During the press run, press sheets are automatically scanned, and the resulting measurements are used to adjust the amount of ink that is transferred from the ink fountain to the press sheet. This process helps ensure consistent and accurate color reproduction throughout the press run

Step 3: Finishing and Bindery

Finishing and bindery takes place after the press run has completed. Once the printing process has been completed, the printed project is moved to the finishing and bindery department where a wide variety of services take place to enhance the function and overall appearance of the printed piece. This includes scoring, trimming, folding, die-cutting, drilling, binding and more.

For multi-paged printed materials, like catalogs and booklets, bindery is where the printing manufacturing process is completed. Press sheets have been run through the press, allowed to dry, and transported to the bindery for finishing. Press sheets are then cut, collated (gathered and arranged) and folded (if necessary) into the appropriate configuration for the desired product. To learn more about the bindery options we offer, including perfect binding, click here.

For brochure printing, sheets are cut down and folded on high-speed folding machines called “folders.” For catalogs and magazines, the press sheets are folded in nested order, so that they can be stitched together (stapled) to form the finished product.

In the stitching process, a machine called a “stitcher” takes the folded press sheets (called “signatures”) and collates them together. Then, stitches (staples) are inserted into the fold of the signatures, binding them together.

The final components in the “stitcher” are the knives, which trim the paper to the final delivered size. The product is then ready to be shipped to the end destination.

Have questions?

Available from 9AM to 5PM EST, our team is here to help.


Help & Resources

To create an account, please click on the "Login" link located at the top right of the navigation bar.

You will be directed to the login page. From here, click on the "Register now" link located under the "Log in" button.

Brochure folding options.

You will then be directed to the registration page. Fill in all fields. The email you fill in will be your Username for logging in. After filling in all of your information, click the "Register" button. This will direct you back to the Login page where you can fill in your Username (the email you used to register) and your password.

Brochure folding options.

On the Login page, click the "Forgotten password" link located above the "Log In" button.

Brochure folding options.

This will direct you to a new page. Enter your email (this is the username you use to log in) and press "Send." You will receive an email from us; please click on the link in the email to reset your password.

Brochure folding options.

You will be directed to a screen like the one below, asking you to add a new password and then repeat it. Once you have entered your new password, click "Save" and then "Login" to go back to the Login page, where you can log in using your new password.

Brochure folding options.Brochure folding options.

To begin ordering, please log in to your account. You can log in by clicking the "Login" link at the top right of the navigation bar and using the email address you used as your username during registration. Once logged in, you will be able to view and shop for all products associated with your account and brand.

If applicable, you can filter your brand's products using the checkboxes to the right of your screen, the search bar, or the Sort Mode and Sort Direction dropdowns. Click the "Order" button for the product you would like to order.

Brochure folding options.

For static products (products that do not require customization), you can select specific options that are not grayed out, including your quantity, turnaround time (the time it takes to print your order), and add a Name for your job. Then, press "Add To Cart." Any options that are grayed out cannot be changed.

Brochure folding options.

For design products (products that can be personalized), you will need to select or input any options that are not grayed out. Then, press the "Design" button to begin personalizing your product.

Brochure folding options.

A new view will appear, allowing you to begin personalizing your product. Insert any needed fields, such as contact information, background colors, images, etc. You will see the design populate your information. This is exactly how your product will look when printed. Once you have completed your customization, click "Save & Approve". This will take you back to the product page, where you can click on "Add To Cart" to proceed.

Brochure folding options.

By clicking on "Add To Cart," you will be directed to your cart, or you can access your cart at any time by clicking on the bag icon in the top right of the navigation. Here, you will see all current products in your cart. You can edit your design from here if needed, delete, save a product for later, or upload files if required. Please note you can upload files after checking out as well. Once you are ready, click on "Checkout" to begin the checkout process.

Brochure folding options.

For products that require an uploaded art file, you can click on the "View/Upload Files" and then drag and drop files or select from your local files. After uploading, click "Complete Upload." After completing the upload successfully, the "Actions Needed" status will show a checkmark. Now, you can click checkout to proceed. Or you can skip the upload file process and upload your files after checkout by visiting "Your Jobs."

Brochure folding options.

If this is your first time ordering, you'll be directed to a Shipping Address input screen. Input all relevant shipping information. You can then set this address as your "Default Shipping" or "Default Billing" to have it prepopulate in the future. Name your address and click "Save Address" to save it to the address book held on your Account. You'll then be taken to the Shipping Information Screen.

Brochure folding options.

On the Shipping Information screen, click on the "Edit Shipments" button to change or add an address or split a shipment. To change the shipping type/carrier, click on the dropdown highlighted below to show a list of shipping options.

Brochure folding options.

If you click on the "Edit Shipments" button, you will be directed to the Shipping Edit screen. Here, you can add a new address by clicking on "Add Address." You can change the shipping destination on this page by selecting the destination dropdown and selecting an address listed in your Account's addresses. To split a shipment, click "Add" to add multiple packages and send each package to different locations. Ensure the quantity totals the total quantity specified in your order. Once ready, click "Save Shipments" to return to the Shipping Information screen and then press "Continue" to proceed to Checkout.

Brochure folding options.

After clicking on the "Continue" button, you will be directed to the payment page. Here, you can enter Purchase Order #s, if desired, which are provided on invoices for the order. Your brand may be set up with Terms, in which case, you will see a similar screen to the one below. If your brand requires payment at checkout, you will see a field to insert a payment method. Once ready, click "Place Order."

Brochure folding options.

At any time, you can visit your past and current jobs by clicking on the "Your Jobs" in the "Account" dropdown. Here you will find all your jobs and their information. You can also upload art or mailing files here if needed and filter your jobs by status.

Brochure folding options.

For products that require an art file upload, you will need to approve your proof so that your job moves into production. Once your proof is ready, you'll receive a "Proof Ready" email. Click on the link to go to your portal login page.

Brochure folding options.

Once logged in, click on the account dropdown in the top right of the screen and select "Jobs" (there should be a number highlighted for the number of jobs that have an "Action Required.")

Brochure folding options.

Once on the Jobs screen, if you have any jobs requiring attention, they will be immediately shown under "Action Required." "Job Status" will show as "Waiting for PDF Approval." Click on "Approve Proof" to begin the proof approval process.

Brochure folding options.

Click "Download Proof" to download and view your PDF Proof file.

After downloading and viewing the proof, if there are no changes needed, simply select "I approve my proof" and then "Submit" to send your job directly into production.

Brochure folding options.

If you have questions after viewing your proof, select "I have questions about my proof." Frequently asked proof questions will appear. Include a message to our prepress team or request a change to your artwork and then click "Submit." Your message will be sent to our prepress team. The job won't be moved into production, and another proof approval will be required after our team has addressed your question or changed the artwork.

Brochure folding options.

After viewing your proof and you need to upload an entirely new art file, select "There are changes to the file(s), I will submit new art." Click submit. The job listed on your Jobs page will now prompt you to upload new art. Select "Upload Art." Upload the new art file from your local files and then click "Complete Upload" to finish the process.

Brochure folding options.Brochure folding options.Brochure folding options.

Select "I need to request changes, please provide a quote" if you need to completely change the specifications of the product you ordered. We will then be in touch, and your current job will not move into production.

Brochure folding options.

You should receive an email with a link to your proof within 2-8 business hours after uploading your file.

Need additional assistance? Click below to chat with our team of experts.

Chat With Us